So I would like to start off by apologizing for not posting for quite awhile and I am looking forward to starting again. I also added a direct link from my website to my blog.
So the post is going to be in regards to breeding season with my iguanas. Now for the most part there are changes in all females and males during this time however now all will be to the same extent.
As breeding season approaches my females have starting eating a lot more, this helps them build up their fat stores for when they are gravid and stop eating. So Molly, Phoenix and Sassy have ben eating so much! Another thing I have noticed is my females stop going to the bathroom in their normal spots. Sassy is a perfect example of this. During the year Sassy goes to the bathroom in her large water tub that's in her room. When she is in breeding season however she seems to forget where she needs to go, she starts going in her basking area on he floor or even on the shelf where her food is. This makes for a constant mess to clean up as she tend to go Moe frequently also during this time.
During this time also my females try to get out of their enclosures a lot more and start digging in corners. Phoenix is normally chill and likes to relax and climb around inside her enclosure and doesn't come to me when I open the door. However during this time of year she is practically climbing on me to get out and when she is out..... she goes right over to Billy.
My males are a little different. Billy is such a sweet iggy, even when he is acting tough that is all it is.... an act. He will come running over to me all puffed up, spikes held straight and stiff and his tail waving back and forth but no matter what I can pet him on the head and give him a kiss no matter his mood. I wish I could say this in regards to all males but its just not true. Some males become so aggressive their owners cannot get close to them and normal things such as feeding and cleaning their enclosures become a very dangerous job.
Even though Billy is such a sweet boy, when he is out while I am cleaning I always know where he is and what he is doing. He has, on two occasions, tried very hard to bit and attack me during breeding season so even though he's a good boy I always keep an eye on him, especially during this time of year.
Pip is two now and he did go through a small breeding season last year when he was really young but this year he is going full out. He is still small however he is more aggressive than Billy who I much larger and stronger.
Since Pip is so small and out of breeding season Molly didn't like him I could not have them together to socialize as the risk were to high for Pip as Molly could have easily killed him. So now that breeding season has starting and Molly's hormones are going crazy she doesn't mind him. So they get to socialize for hours each day under my supervision. Molly was very reluctant to let Pip near her at the beginning but wouldn't attack him, she is coming around now and letting him get closure but till not allowing him to mate. So hopefully in the next week or so she will fully accept him ( and don't worry I will be so excited if this happens that I will be posting it everywhere).
Billy isn't quite in breeding season yet but him ad Phoenix are together the entire time I am home and when I go to work she is put back in her enclosure.
As for Sassy, I do not and will not breed her, I am only breeding green iguana colour mophs and not regular green iguanas.
So this is where I am sitting now with my iguana, again, I apologize for not posting for so long and I will be getting back into it!!!!!
Robin!
Saturday, 17 January 2015

Saturday, 22 November 2014
LOUIE OUR SAVANNAH MONITOR
So I've had a lot of questions recently regarding the savannah monitor that my boyfriend and I own, Louie, so I thought I would do a blog post about his story so everyone who wants to know can :)
So we got Louie as a hatchling from the local reptile shop, he was so cute and we couldn't resist. Both my boyfriend and I have a great passion for reptiles and did our research prior to getting him.


So we got Louie as a hatchling from the local reptile shop, he was so cute and we couldn't resist. Both my boyfriend and I have a great passion for reptiles and did our research prior to getting him.
This is Louie shortly after we got him, he grew so fast, just like many reptile species do. So when they grow as fast as he did, if their calcium levels drop a little to low it can cause a more damage than if it was a full grown adult.
Louie started showing signs of early stages of MBD, his walking gate was a bit off and he held his back end a bit differently. So we immediately took him to the local Hero Vet to be checked out. At this point we didn't know these were signs of MBD so we weren't sure what was going on with him, so we asked out "experienced" vet. I've been to this vet before and never had any issues until that day.
Louie went in and she did some X-ray and checking him over, watched him walk around but she couldn't figure out what it was that was causing this issues he was having.... I'm no where near a vets education however knowing what I know now I would have been able to determine that right away.
So our Vets sent me home with Louie with basically no results and said to give him some time and didn't suggest changing anything we were doing.... well with MBD that's the exact opposite of what needed to be done... and I know that now. So over the next week I did so much research trying to figure out how to help him and that'd when I found out he had MBD. I was devastated, like any owner should be. So we corrected everything that needed fixed immediately and that stopped him from progressing even more, but by that time he had already had some deformities in all his legs and tail.
Looking back I should have gotten a second vets opinion, but I trusted my vet and what she had to say. That was my mistake. If I had of taken him to a second vet who diagnosed the issue he would be in better shape today. So as he grew is issues changed.
We built him an enclosure that was a good design for savannah monitors, but he had trouble moving around in it and he doesn't burrow with the way his legs are. So we just finished making him a new enclosure that was easier for him to move around in and get in and out of. This is Louie now.
The curve in his tail is actually fused like that, his tail has a permanent kink in it from mbd. You can also see in this picture his thing of his back leg is really thick at the top. All four of his legs have issues but he still gets around ok. his front feet cannot bend forward as far as they need to in order to walk properly so they actually bend underneath of his when he walks
We do our best to keep hum active but he does have restrictions.
SO please learn from my mistakes take your reptile to the vet if you notice an issue and dot be afraid of getting a second opinion from a different herp vet.
Thank you,
Robin Small
Ontario Iguanas
Thursday, 13 November 2014
PHOENIX'S WEIGHT LOSS... REASONS?
Phoenix has always been a good eater since I got here last year, however the last month and a half she has been eating basically NOTHING and has lost a lot of weight because of it.
She has still been very active and her mood is still the same but then I made the connection. Before my reptile room was flooded I had Molly, Billy and Phoenix out all together like I normally do, but this time Molly actually charged at Phoenix and Phoenix darted off. The old layout of the room was fine as they couldn't really see each other but after the flood all my iguanas and their enclosures were moved to the unfinished side of the basement. There wasn't a lot of space so the enclosure were packed in tight together. PHOENIX'S enclosure ended up facing Molly's a couple meters away from each other.
It was right around this time that Phoenix began to stop eating. I picked up on this quickly and used a towel to block off most of her windows in her doors. However this didn't work and I didn't have any other place to move her enclosure.
Today I was so excited because I finished Billy's enclosure and got PHOENIX'S enclosure moved back into the reptile room. I put Phoenix in with Billy to explore his new enclosure and spend time together. While they were in there I went to get some of their salad mix to give Billy, and Phoenix took no time before diving in and eating half of the big salad. This is the most food I've seen her eat in a month and a half. This just goes to show how the environment outside the enclosure can work with or against your iguanas behaviours.
Things like mirrors hanging in a room where the iguana can see his or her reflection can cause snoot of stress and anxiety for them. So be aware of your iguanas surroundings and any changes you make.
Robin
She has still been very active and her mood is still the same but then I made the connection. Before my reptile room was flooded I had Molly, Billy and Phoenix out all together like I normally do, but this time Molly actually charged at Phoenix and Phoenix darted off. The old layout of the room was fine as they couldn't really see each other but after the flood all my iguanas and their enclosures were moved to the unfinished side of the basement. There wasn't a lot of space so the enclosure were packed in tight together. PHOENIX'S enclosure ended up facing Molly's a couple meters away from each other.
It was right around this time that Phoenix began to stop eating. I picked up on this quickly and used a towel to block off most of her windows in her doors. However this didn't work and I didn't have any other place to move her enclosure.
Today I was so excited because I finished Billy's enclosure and got PHOENIX'S enclosure moved back into the reptile room. I put Phoenix in with Billy to explore his new enclosure and spend time together. While they were in there I went to get some of their salad mix to give Billy, and Phoenix took no time before diving in and eating half of the big salad. This is the most food I've seen her eat in a month and a half. This just goes to show how the environment outside the enclosure can work with or against your iguanas behaviours.
Things like mirrors hanging in a room where the iguana can see his or her reflection can cause snoot of stress and anxiety for them. So be aware of your iguanas surroundings and any changes you make.
Robin
UNDER THE STAIRS IGUANA ENCLOSURE
So as most of you know for the past couple months we have ben renovating our basement which is also our reptile room. It was just finished this past Sunday so I have been getting the cages ready to move them back in and just started doing so today.
All my iguanas needed to be moved to a larger enclosure so I came up with an idea and drawing of a large enclosure underneath the stair case for my larger male Billy. This would open up his larger enclosure he was currently in, Phoenix will be getting his old enclosure once everything is done however Molly is currently in it.
So on Sunday we did the framework for the enclosure and the last couple days I have been putting up the Plexiglas, made the door and then filled it with shelves and branches to climb on. I am really happy with how the enclosure turned out and its a great way to use up that space. If you haven't seen the picture of it yet here it is....


 So this is the light set up that I'm using for his new enclosure, if you'd like to learn how to easily put a built in heat fixture click
All my iguanas needed to be moved to a larger enclosure so I came up with an idea and drawing of a large enclosure underneath the stair case for my larger male Billy. This would open up his larger enclosure he was currently in, Phoenix will be getting his old enclosure once everything is done however Molly is currently in it.
So on Sunday we did the framework for the enclosure and the last couple days I have been putting up the Plexiglas, made the door and then filled it with shelves and branches to climb on. I am really happy with how the enclosure turned out and its a great way to use up that space. If you haven't seen the picture of it yet here it is....


Now just to clear something up, yes Phoenix is in the enclosure with Billy however they are housed separately. She was just in there to look around and explore.
So that is what his finished enclosure looks like, I love how it turned out! I didn't go all the way to the end of the stairs for a few reasons...
1. My cats litter box used to go there so I left room for it but now I'm going to move it out of that room completely.
2. Its a very awkward angle and if I needed to clean in there it would just be to much. If you Wanted to use this idea and go all the way to the end I would suggest putting a small second door near the end to help with cleaning.
Because most of the frame work was there already (the two walls) the only big expense for this was the Plexiglas for the windows. I don't know why its so expensive but it looks so much better than chicken wire or aluminum mesh that its worth it.
 So this is the light set up that I'm using for his new enclosure, if you'd like to learn how to easily put a built in heat fixture click
here to see my YouTube video for full instructions and detail
Thanks for reading!!
Robin
Robin
Saturday, 1 November 2014
PICKING THE RIGHT AGE OF YOUR FIRST IGUANA
There are many pro's and con's to the different ages of green iguanas and it can be a make or break point for the owner if the match doesn't work out well.
This bog post is going to be a quick guide to finding help people decided what age of iguana would b appropriate for their situations and lifestyle.
Many people go into the pet store an see the adorable litter green iguana and on impulse they purchase them. Then in a couple months the little baby hasn't calmed down at all and its up for sale to find a new home. Its important to find the right age that will work with your lifestyle and experience.
Now everything I say is my own opinion from my experience and I am talking about the average in experiences there will always be exceptions to this.
I will start off by talking different age choices for a first time iguana owner. I normally like to recommend an iguana that I around 2-3 years for first time owners. The reasoning behind this is that when taming a baby it is very important to learn their body language and just your behaviour accordingly. Baby green iguana are naturally very flighty and this can be very overwhelming for a new owner. The amount of time needed for a baby iguana is really high in order to get them tamed and keep them happy and not stressed. A lot of new owners aren't aware of the time they need which leads a lot of them into new homes. So beside the fact that babies take a lot of work and time and patience to get them to where they are a nice companion I don't recommend larger or older thin 4 years old for new owners either. The reason behind this is that iguana can cause a lot of damage when they get aggressive, (even he calmest iguana can be aggressive) and I would be lying if I said you wouldn't get bit. The best way to learn is by your mistakes. Your iguana will give body signals when its not happy with what you are doing. So you must learn these signals and learn how to read them, and I would prefer to get a nip from a smaller iguana than an 6ft adult male.
So for new owners I recommend a medium sized iguana, this size is big enough to handle easily but yet small enough to control if necessary.
But if your going to get an iguana at this age, where do you get it? Look up local reptile rescue centers or on sites like Kijiji or other sale sites. Try to find a healthy 2-3 year old iguana and one that has been worked with a bit. In some cases you can get an iguana that is more or less tamed. This gives you the perfect chance to understand them more and if you get another one in the future than maybe try a baby iggy.
If you wish to get and raise a baby iguana. Just be aware of the time and patience they take and be ready to put in the time and not give up on the iguana. You must respect them for what they are and that is a reptile that is still very intact with its natural behaviours an instincts. If you wish to get an iguana try to understand the world from their eyes in order to work with them better.
Robin
Ontario Iguanas.
This bog post is going to be a quick guide to finding help people decided what age of iguana would b appropriate for their situations and lifestyle.
Many people go into the pet store an see the adorable litter green iguana and on impulse they purchase them. Then in a couple months the little baby hasn't calmed down at all and its up for sale to find a new home. Its important to find the right age that will work with your lifestyle and experience.
Now everything I say is my own opinion from my experience and I am talking about the average in experiences there will always be exceptions to this.
I will start off by talking different age choices for a first time iguana owner. I normally like to recommend an iguana that I around 2-3 years for first time owners. The reasoning behind this is that when taming a baby it is very important to learn their body language and just your behaviour accordingly. Baby green iguana are naturally very flighty and this can be very overwhelming for a new owner. The amount of time needed for a baby iguana is really high in order to get them tamed and keep them happy and not stressed. A lot of new owners aren't aware of the time they need which leads a lot of them into new homes. So beside the fact that babies take a lot of work and time and patience to get them to where they are a nice companion I don't recommend larger or older thin 4 years old for new owners either. The reason behind this is that iguana can cause a lot of damage when they get aggressive, (even he calmest iguana can be aggressive) and I would be lying if I said you wouldn't get bit. The best way to learn is by your mistakes. Your iguana will give body signals when its not happy with what you are doing. So you must learn these signals and learn how to read them, and I would prefer to get a nip from a smaller iguana than an 6ft adult male.
So for new owners I recommend a medium sized iguana, this size is big enough to handle easily but yet small enough to control if necessary.
But if your going to get an iguana at this age, where do you get it? Look up local reptile rescue centers or on sites like Kijiji or other sale sites. Try to find a healthy 2-3 year old iguana and one that has been worked with a bit. In some cases you can get an iguana that is more or less tamed. This gives you the perfect chance to understand them more and if you get another one in the future than maybe try a baby iggy.
If you wish to get and raise a baby iguana. Just be aware of the time and patience they take and be ready to put in the time and not give up on the iguana. You must respect them for what they are and that is a reptile that is still very intact with its natural behaviours an instincts. If you wish to get an iguana try to understand the world from their eyes in order to work with them better.
Robin
Ontario Iguanas.
Saturday, 25 October 2014
KEEPING TRACK OF YOUR IGUANAS WEIGHT
I find keeping track of their weight to be a very helpful and interesting. When kept track of regularly these numbers can show you many different things.
This can be the most helpful during your iguana's first couple of years while they are still small.
I keep my numbers in grams, that way I can see slight changes. Certain things to look for are drastic changes in weight and what they relate to. For example if you move your iguana to a new enclosure or a new spot in the house you could see how this affects him physically by looking at his behaviours, how much he is eating and his weight change. If for what ever reason your iguana becomes sick, you can calculate how much weight he or she is loosing and how fast.
A good example of this is when I first got Pip he had worms. Now at first I didn't know he had them as I couldn't see them in his feces and he was eating lots of food but not getting bigger at all. This was then proven by the weight I was tracking of him. I could easily look back and pinpoint when he started loosing weight and how soon after treatment he started to gain it. Sadly I was given the wrong worm medication for him so it slowed them down but didn't get rid of them right away, which is why part of the reason why he is so much smaller than Molly, that and the fact Molly is an abnormally fast grower.
These numbers are a great resource for your vet to look at also. Even if you just take your ig for a check up your vet can have a look at the numbers also, it never hurts.
This year I will be paying a lot of attention to the breeding season of both Pip and Billy (both my males) as males loose a lot of weight during this time as they stop eating mostly or completely. I am really interested in what percentage of their body weight they loose.
I will also be focusing on my females. Before breeding season females tend to eat a lot more and bulk up to prepaid themselves for the coming months of being gravid. I will be documenting how much weight they gain during this time and how much they weigh after they lay their eggs to get a percentage.
I just use a small digital food scale that can change the unit it measures in, if you have an iguana that won't sit still or is aggressive (a male in breeding season) simple weigh them in a small grate then minus the weight of the crate.
The following are all the weights I have been keeping track of since the day I got Molly and Pip back in April of 2013. My main focus was the weight of Molly and Pip and recently I haven't been on the ball as much due to the basement renovation. However that will change soon :)


This can be the most helpful during your iguana's first couple of years while they are still small.
I keep my numbers in grams, that way I can see slight changes. Certain things to look for are drastic changes in weight and what they relate to. For example if you move your iguana to a new enclosure or a new spot in the house you could see how this affects him physically by looking at his behaviours, how much he is eating and his weight change. If for what ever reason your iguana becomes sick, you can calculate how much weight he or she is loosing and how fast.
A good example of this is when I first got Pip he had worms. Now at first I didn't know he had them as I couldn't see them in his feces and he was eating lots of food but not getting bigger at all. This was then proven by the weight I was tracking of him. I could easily look back and pinpoint when he started loosing weight and how soon after treatment he started to gain it. Sadly I was given the wrong worm medication for him so it slowed them down but didn't get rid of them right away, which is why part of the reason why he is so much smaller than Molly, that and the fact Molly is an abnormally fast grower.
These numbers are a great resource for your vet to look at also. Even if you just take your ig for a check up your vet can have a look at the numbers also, it never hurts.
This year I will be paying a lot of attention to the breeding season of both Pip and Billy (both my males) as males loose a lot of weight during this time as they stop eating mostly or completely. I am really interested in what percentage of their body weight they loose.
I will also be focusing on my females. Before breeding season females tend to eat a lot more and bulk up to prepaid themselves for the coming months of being gravid. I will be documenting how much weight they gain during this time and how much they weigh after they lay their eggs to get a percentage.
I just use a small digital food scale that can change the unit it measures in, if you have an iguana that won't sit still or is aggressive (a male in breeding season) simple weigh them in a small grate then minus the weight of the crate.
The following are all the weights I have been keeping track of since the day I got Molly and Pip back in April of 2013. My main focus was the weight of Molly and Pip and recently I haven't been on the ball as much due to the basement renovation. However that will change soon :)
Thank you for reading
Robin Small
Wednesday, 15 October 2014
GET YOUR REPTILE IN A CALENDAR!
I AM GOING TO BE PUTTING 3 DIFFERET CALEDARS TOGETHER FILLED WITH PICTURES OF YOUR REPTILIAN FRIENDS. THE CALENDARS ARE
1. ALL REPTLE SPECIES #REPTILECALENDAR
2. GREEN IGUNAS . #IGUANACALEDAR
3. IGUANA MORPHS AND OTHER IGUANID SPECIES #MORPHCALENDAR
THESE CALENDARS WILL BE MADE TO ORDER ONLY. HERE ARE THE RULES AND HOW TO SUBMIT YOUR PHOTOS. I CAN ONLY FIT A MAX OF 72 PICTURES PER CALENDAR (6 PER PAGE)
1. UPLOAD A MAX OF 2 PICTURES (FOR NOW) TO INSTAGRAM USING THE APPROPRIATE HASHTAG ABOVE FOR THE CALENDAR YOU WOULD LIKE TO ENTER. YOU CAN ENTER 2 PICTURES PER CALENDAR
2. ALL PICTURES MUST BE ENTERED BEFORE OCTOBER 31ST OR MAY NOT BE USED
3. YOU MUST PRE PAY FOR YOUR CALENDAR ON MY ONLINE STORE HERE BETWEEN NOVEMBER 1ST TO NOVEMBER 10TH
4. PHOTOS ARE TO BE OF REPTILES ONLY, NO PEOPLE OR OTHER ANIMALS.
5. CALENDARS WILL BE 25$ PLUS SHIPPING. SEE ONLINE STORE FOR DETAILS AND PRICING.
THESE CAN MAKE EXCELLEND CHRISTMAS GIFTS FOR THE REPTILE LOVER IN YOUR FAMILY.
THE FOLLOWING IS A LIST OF THE CANADIAN HOLIDAYS THAT WILL BE LISTED
-NEW YEARS DAY
-FAMILY DAY
-VALENTINE'S DAY
-ST. PATRICK'S DAY
-GOOD FRIDAY
-EASTER MONDAY
-MOTHER'S DAY
-VICTORIA DAY
-FATHER'S DAY
-CANADA DAY
-CIVIC HOLIDAY
-LABOUR DAY
-THANKSGIVING
-HALOWEEN
-REMEMBRANCE DAY
-CHRISTMAS EVE
-CHRISTMAS DAY
-BOXNG DAY
-NEW YEARS EVE
THE FOLLOWING IS A LIST OF THE US HOLIDAYS THAT WILL BE LISTED
-NEW YEARS DAY
-MARTIN LUTHER KING DAY
-PRESIDENTS' DAY
-INDEPENDENCE DAY OBSERVED
-INDEPENDENCE DAY
-COLUMBUS DAY
-THANKSGIVNG DAY
-VICTORIANS DAY
-CHRISTMAS
-LABOUR DAY
-MEMORIAL DAY
SO REMEMBER....... YOU MUST PRE PAY FOR YOUR CALENDAR BY NOVEMBE 10TH AS I AM ONLY HAVING AS MANY AS ARE ORDERED MADE. PLEASE ONLY ENTER PHOTOS IF YOU ARE PLANNING ON PURCAHSING A CALENDAR. ONCE PICTURES START TO COME IN I WILL PUT PICTURES OF IT UP IN MY ONLINE STORE.
1. ALL REPTLE SPECIES #REPTILECALENDAR
2. GREEN IGUNAS . #IGUANACALEDAR
3. IGUANA MORPHS AND OTHER IGUANID SPECIES #MORPHCALENDAR
THESE CALENDARS WILL BE MADE TO ORDER ONLY. HERE ARE THE RULES AND HOW TO SUBMIT YOUR PHOTOS. I CAN ONLY FIT A MAX OF 72 PICTURES PER CALENDAR (6 PER PAGE)
1. UPLOAD A MAX OF 2 PICTURES (FOR NOW) TO INSTAGRAM USING THE APPROPRIATE HASHTAG ABOVE FOR THE CALENDAR YOU WOULD LIKE TO ENTER. YOU CAN ENTER 2 PICTURES PER CALENDAR
2. ALL PICTURES MUST BE ENTERED BEFORE OCTOBER 31ST OR MAY NOT BE USED
3. YOU MUST PRE PAY FOR YOUR CALENDAR ON MY ONLINE STORE HERE BETWEEN NOVEMBER 1ST TO NOVEMBER 10TH
4. PHOTOS ARE TO BE OF REPTILES ONLY, NO PEOPLE OR OTHER ANIMALS.
5. CALENDARS WILL BE 25$ PLUS SHIPPING. SEE ONLINE STORE FOR DETAILS AND PRICING.
THESE CAN MAKE EXCELLEND CHRISTMAS GIFTS FOR THE REPTILE LOVER IN YOUR FAMILY.
THE FOLLOWING IS A LIST OF THE CANADIAN HOLIDAYS THAT WILL BE LISTED
-NEW YEARS DAY
-FAMILY DAY
-VALENTINE'S DAY
-ST. PATRICK'S DAY
-GOOD FRIDAY
-EASTER MONDAY
-MOTHER'S DAY
-VICTORIA DAY
-FATHER'S DAY
-CANADA DAY
-CIVIC HOLIDAY
-LABOUR DAY
-THANKSGIVING
-HALOWEEN
-REMEMBRANCE DAY
-CHRISTMAS EVE
-CHRISTMAS DAY
-BOXNG DAY
-NEW YEARS EVE
THE FOLLOWING IS A LIST OF THE US HOLIDAYS THAT WILL BE LISTED
-NEW YEARS DAY
-MARTIN LUTHER KING DAY
-PRESIDENTS' DAY
-INDEPENDENCE DAY OBSERVED
-INDEPENDENCE DAY
-COLUMBUS DAY
-THANKSGIVNG DAY
-VICTORIANS DAY
-CHRISTMAS
-LABOUR DAY
-MEMORIAL DAY
SO REMEMBER....... YOU MUST PRE PAY FOR YOUR CALENDAR BY NOVEMBE 10TH AS I AM ONLY HAVING AS MANY AS ARE ORDERED MADE. PLEASE ONLY ENTER PHOTOS IF YOU ARE PLANNING ON PURCAHSING A CALENDAR. ONCE PICTURES START TO COME IN I WILL PUT PICTURES OF IT UP IN MY ONLINE STORE.
Friday, 10 October 2014
BUILT IN FIXTURES VS DOMES.
THERE ARE PROS AND CONS TO EACH.
I am switching all my enclosure over to built in light fixtures and getting rid of the domes. The only two enclosure that have domes are Molly's enclosure and my savannah monitor Louie. However once the basement is done then they will both have new enclosure and they will both have the built in lights.
You DO NOT need to have any electrical experience to hook these up, its very simple.
Things you will need.
Metal mounting bracket
Porcelain lampholder
Lamp replacement cord
2 screws (size depends on the thickness of your enclosure)
Screwdriver or drill
All these things can be found at any local home renovation store like Home Depot, RONA or Lowes
The following picture is material for two heat bulbs
.JPG) At the top of the picture you can see two metal mounting brackets, these will be screwed to the ceiling of the enclosure where you wish to put the eat light. The circle shapes on the top of the bracket can be pushed pot easily to feed the wire through. If your domes are mounted inside the enclosure hanging on a hook you most likely have a hole already that the wire is exiting the enclosure from your dome. If its in the ceiling you can mount this bracket over the hole and feed the wire right through the top of the bracket and through the hole. If the existing wire hole is in a spot where you can't mount the bracket (ie. The side/back of the enclosure) ou can feed the wire through the side of the bracket where the mounting screw is then feed it out of the hole.
At the top of the picture you can see two metal mounting brackets, these will be screwed to the ceiling of the enclosure where you wish to put the eat light. The circle shapes on the top of the bracket can be pushed pot easily to feed the wire through. If your domes are mounted inside the enclosure hanging on a hook you most likely have a hole already that the wire is exiting the enclosure from your dome. If its in the ceiling you can mount this bracket over the hole and feed the wire right through the top of the bracket and through the hole. If the existing wire hole is in a spot where you can't mount the bracket (ie. The side/back of the enclosure) ou can feed the wire through the side of the bracket where the mounting screw is then feed it out of the hole.
The next piece in this photo is porcelain lampholder. This is the piece you will be attaching your wires to as well as your heat bulb, you can purchase these with a pull chain to turn on and off ( I don't recommend those)
At the bottom of this pic you see the two lamp replacement cords. Its a simple cord with a on and off switch on it. In total for one light it is less than $10 to have this full set up, which is cheaper than a dome. And takes up a lot less space.
The following picture is a close up of what the porcelain lampholder looks like.


I am switching all my enclosure over to built in light fixtures and getting rid of the domes. The only two enclosure that have domes are Molly's enclosure and my savannah monitor Louie. However once the basement is done then they will both have new enclosure and they will both have the built in lights.
You DO NOT need to have any electrical experience to hook these up, its very simple.
Things you will need.
Metal mounting bracket
Porcelain lampholder
Lamp replacement cord
2 screws (size depends on the thickness of your enclosure)
Screwdriver or drill
All these things can be found at any local home renovation store like Home Depot, RONA or Lowes
The following picture is material for two heat bulbs
The next piece in this photo is porcelain lampholder. This is the piece you will be attaching your wires to as well as your heat bulb, you can purchase these with a pull chain to turn on and off ( I don't recommend those)
At the bottom of this pic you see the two lamp replacement cords. Its a simple cord with a on and off switch on it. In total for one light it is less than $10 to have this full set up, which is cheaper than a dome. And takes up a lot less space.
The following picture is a close up of what the porcelain lampholder looks like.
NOTE
Before attaching the wires to the lampholder, feed the cord through the mounting bracket in the spot you need. If you don't do this you won't be able to feed it through after. FEED IT THROUGH THE MOUNTING BRACKET FIRST. (feed a lot of cord through to give yourself lots of room when it comes to hanging it up)
The following picture is demonstrating how to hook the wires up. On this side of the lampholder there are 4 screws, 2 on each side. DO NOT attach both wires to the same side. You will plug it in after and blow a fuse. So simple attach one wire to one side and another wire to the other side, both sides have different colour screws it doesn't matter what wire goes to what side. Just make sure they are not on the same side. Place the exposed end of the wire under the screw and tighten the screw down so it pinches and holds the wire there.
So at this point you should have your cord fed through the mounting bracket (side or top depending where you're putting it) and attached to the porcelain lampholder. Take everything to the enclosure and if the cord is fed though the top of the bracket, feed the cord through the hole in the enclosure and mount the bracket to the ceiling with two screws. (bought separately) then slide the porcelain lampholder over the two screws on the bracket and tighten them as described above to hold everything in place.
Now all you have to do is put your bulb in and plug the cord in and you have light and heat for your reptile.
Pros.
Takes up less space
Looks cleaner
Allows light to travel out more than a dome does
Easy to install only tools is a screwdriver or drill
Keeps the bulb from moving around which makes the bulb last longer (vs if you pick your domes up and move them)
Cons.
If you have a large hole cut in the top of the enclosure covered in mesh where your dome sits you cannot month this there.
You can with a bit of work and filling the hole in but it make its a lot more work.
This following photo shows the difference flight in Billy's enclosure when I switched his stuff over. He had the combination UV and heat bulb (I don't use these anymore) but his enclosure is so much brighter now.
This may be hard to understand however I will be making a YouTube video to better describe and actually show you how to put this together and mount it in an enclosure.
Robin Small
Ontario Iguanas.
Wednesday, 1 October 2014
TAIL REGROWTH IN IGUANAS.
A lizard never WANTS to drop off any amount of their tail, the only time a lizard will drop its tail is when they feel their life is threatened and its a last resort to escape the predator. When I mean last resort it really is just that, an iguana may try absolutely everything to get away before dropping its tail.
Things to avoid to keep your lizard's tail intact. NEVER hold your iguana by the tail, even with the body supported if you are holding the tail there is a possibility of it leading to the tail dropping if he/she becomes frightened. The best place to hold the back of the iguana for support is placing your palm of your hand under the base of the tail with your fingers running up the stomach and up the side in front of the hind legs.
If your iguana got loose and you are trying to catch it do not grab it by the tail, if your iguana is already panicky and you grab it suddenly by the tail its likely going to drop it in the frightened state.
If you happen to grab the tail the iguana will most likely do a few things prior to dropping it. The iguana should first wiggle the tail hard trying to get you to let go, then may start to try to run and roll.
No iguana wants to rope their tail and will do anything to keep from loosing it.
Other reason for a dropped tail. You don't have to grab a tail for it to drop off, the tail is long and for babies its very slender, the tail could get pinched in a door by accident. When this happens its often a small section at the end of the tail maybe an inch or two. If this happens you will notice a flattened spot where it got pinched, let the iguana body handle the rest but keep monitoring it (unless signs of infection occur, I will talk about the next). The section of the tail from the pinch to the tip will become rock hard in the next couple days, this is the section of the tail dyeing. Once the section is dead the iguana will then drop that section.
When caring for a dropped tail it may vary depending on how much of the tail was lost. Remember! Iguanas are built to withstand this type of injury in the wild where its far from clean. They are tough lizards, just keep the area dry and clean until the open tip has healed over. You can put an antibiotic ointment on it such as polysporn once a day to help fight any infection. If the drop affects more than half the length of the natural tail, please take the iguana to a vet to be checkout. The higher the drop the larger the blood vessels are and it will affect more nerves. The care is relatively the same, will just take longer for the pen end to heal over. Make sure the iguana has enough calcium in the diet to allow the REGROWTH to happen safety without having to strip it from other parts of the iguana's body
Another reason an iguana may drop its tail is from an infection. There are different ways an infection may occur, a cat scratch, dog bite etc. one common way an infection may occur is from the iguana hitting his or her tail off of something hard like a corner of a wall or an end of a branch/shelf in the enclosure. When an iguana whips his or her tail its very fast with a lot of power, if it hits something the wrong way it may cause a cut or some sort of injury that leads to infection. Signs of infection normally are swelling and a liquid yellow pus substance. As the tail swells the scales drift apart and you begin to see the pus between the scales.
The following pictures are not mine, I took them off of Google. However these photos show a tail injury on a green iguana and different ways they can look.
 this photo shows a cut on the tail, this can be caused by another pet or smacking it very hard off an object.
 notice both of the puncture marks on the tail, this was most likely caused by a bite, those marks are probably from a cat.
 This is Pip's tail. When purchased him he was shipped to me. From what I seen it looked like when they were putting the lid on the container his tail got pinched in it. About an inch and a half fell off shortly after I got him. He has never had any REGROWTH, the tip healed over and that was it,
 I accidentally pinched Billy's tail in his enclosure door and it got pinched, he lost about 3 inches from it. You can see in his talk a bit of a crook in the end, he had it pinched again but I have no idea what it was from as I didn't see it. It wasn't a hard enough pinch to cause it to die and drop off however just a little bend. ( I always watch so carefully know when I put any of my iguanas away, their tails are so thin on the ends they can slide through anything)
 This is Phoenix's tail. She has about half her original tail, she was like this when I purchased her so I do not know how or why her tail was dropped. However she has some very slight REGROWTH starting in the tail. When I got her she had about 5 layers of stuck on shed on there tail which I'm assuming affected the growing process.

Things to avoid to keep your lizard's tail intact. NEVER hold your iguana by the tail, even with the body supported if you are holding the tail there is a possibility of it leading to the tail dropping if he/she becomes frightened. The best place to hold the back of the iguana for support is placing your palm of your hand under the base of the tail with your fingers running up the stomach and up the side in front of the hind legs.
If your iguana got loose and you are trying to catch it do not grab it by the tail, if your iguana is already panicky and you grab it suddenly by the tail its likely going to drop it in the frightened state.
If you happen to grab the tail the iguana will most likely do a few things prior to dropping it. The iguana should first wiggle the tail hard trying to get you to let go, then may start to try to run and roll.
No iguana wants to rope their tail and will do anything to keep from loosing it.
Other reason for a dropped tail. You don't have to grab a tail for it to drop off, the tail is long and for babies its very slender, the tail could get pinched in a door by accident. When this happens its often a small section at the end of the tail maybe an inch or two. If this happens you will notice a flattened spot where it got pinched, let the iguana body handle the rest but keep monitoring it (unless signs of infection occur, I will talk about the next). The section of the tail from the pinch to the tip will become rock hard in the next couple days, this is the section of the tail dyeing. Once the section is dead the iguana will then drop that section.
When caring for a dropped tail it may vary depending on how much of the tail was lost. Remember! Iguanas are built to withstand this type of injury in the wild where its far from clean. They are tough lizards, just keep the area dry and clean until the open tip has healed over. You can put an antibiotic ointment on it such as polysporn once a day to help fight any infection. If the drop affects more than half the length of the natural tail, please take the iguana to a vet to be checkout. The higher the drop the larger the blood vessels are and it will affect more nerves. The care is relatively the same, will just take longer for the pen end to heal over. Make sure the iguana has enough calcium in the diet to allow the REGROWTH to happen safety without having to strip it from other parts of the iguana's body
Another reason an iguana may drop its tail is from an infection. There are different ways an infection may occur, a cat scratch, dog bite etc. one common way an infection may occur is from the iguana hitting his or her tail off of something hard like a corner of a wall or an end of a branch/shelf in the enclosure. When an iguana whips his or her tail its very fast with a lot of power, if it hits something the wrong way it may cause a cut or some sort of injury that leads to infection. Signs of infection normally are swelling and a liquid yellow pus substance. As the tail swells the scales drift apart and you begin to see the pus between the scales.
The following pictures are not mine, I took them off of Google. However these photos show a tail injury on a green iguana and different ways they can look.
this photo shows a cut on the tail, this can be caused by another pet or smacking it very hard off an object.
WHEN YOU SUSPECT INFECTION PLEASE TAKE YOUR IGUANA TO SEE A VET.
IF YOUR IGUANA GETS GAUNGRENE IT WILL NEED SURGERY TO REMOVE AS SECTION OF THE TAIL ABVE THE INFETION TO STOP IT FROM SPREADING.
When at the vet your iguana will most likely be prescribed an antibiotic and have the infected area wrapped. IF THE TAIL GETS WRAPPED, KEEP THE DRESSING DRY
A dropped or removed tail affects more than just the look of the iguana. Depending on the age it can be more serious. With baby and juvenile iguana it can be very substantial. If a baby ig looses a lot of their tail it also looses fat stores along with his way of defending him or herself. So a baby with a missing tail may be more flighty then it was before I dropped I as they may feel more vulnerable without it. Not only that but for the REGROWTH of the tail it takes a lot of energy, and nutrients. When your iguana Is regrowing his or her tail their diet is very important to make sure they have everything they need to stay healthy during this period.
REGROWTH
The following pictures are of my iguana's tails. Each picture will have an explanation bellow it.
First off when a tail REGROWS it will never look or act the same or grow as long as the original tail. Also the tail may not grow back at all. There are two types of breaks in the tail. Between the vertebrae and in the middle of a vertebrae. Depending on where the break is the iguana may not have any REGROWTH in the tail.
Lastly this is Sassy's tail. Sassy became scared one day and whipped her tail and smacking it off the corner of a door frame. It became infected and swollen, I took her to a vet once a week to have an antibiotic injection (she didn't do an oral antibiotic.) the tail was then cleaned and wrapped. unfortunately the wrapping got wet one day while she went to the bathroom causing it not to heal properly. She was scheduled to have it surgically removed since it wasn't healing and it was spreading up the tail. About 4 days before the surgery Sassy actually dropped the section of the tail that was infected (about 5 inches) the break was not straight up and down I was on an angle. I took her back into the vet for a final check up and she just healed normally at home. Due to it being on an angle her REGROWTH grew downwards but stated to curled and to the side since it was dragging on the ground all the time. This is about 3 years of REGROWTH and about as long as it should get.
SO IT GOES TO SHOW YOU MAY NOT BE ABLE TO COMPLETLY AVOID A TAIL FROM DROPPING OFF AS ACCIDENTS HAPPEN HOWEVER YOU CAN LOWER THE CHANCES. LIMIT THE STRESS FOR YOUR IGUANA ANY WAY YOU CAN TO HELP LIMIT THE POSSIBILITY.
I HOPE THIS WAS HELPFUL!
ROBIN.
Wednesday, 24 September 2014
ONTARIO IGUANAS ONLINE STORE
If you follow my instgram or Facebook page you may have seen that my new website is up and active. So I thought I would make a blog post about it also. Recently I have been making and selling reptile hides, basking platforms and climbers at a local reptile pet store. I have decided that on top of selling them there I would attempt to open my own online store to offer them to people beyond London On. The site opened a couple of days ago but the store was activated September 23rd.
Www.ontarioiguanas.com
I have begun thinking of other products to sell along with the current products. I have added a new reptile pillow to my site. This pillow has a built in blanket attached to the top. This allows the lizard to sleep on top of the pillow or bury under the blanket. This pillow comes in different colours and different sizes from ones built for geckos all the way up to adult sized iguanas.
Along with the pillow I will be adding other reptile accessories such as bridges seen in Sassy's room in this picture.

.JPG)
Www.ontarioiguanas.com
I have begun thinking of other products to sell along with the current products. I have added a new reptile pillow to my site. This pillow has a built in blanket attached to the top. This allows the lizard to sleep on top of the pillow or bury under the blanket. This pillow comes in different colours and different sizes from ones built for geckos all the way up to adult sized iguanas.
Along with the pillow I will be adding other reptile accessories such as bridges seen in Sassy's room in this picture.
In about a weeks time I will have bridges available in 2 a 4 foot lengths. Larger ones can be made however they will be made to order. I will have different attachments available for the ends of the bridges depending on where you plan on pacing the.
I will also be putting my artwork up for sale, not just iguana art but other lizards also. The above picture is a sketch I am currently working on that will be for sale. Along with sketches and canvas paintings I wild be offering other reptile based unique crafts for sale great for gifts.
If you would like a custom painting or sketch done. Send me a private message on Facebook with the photos of your or your friend's reptile that you would like the portage done of. These will require a down payment of 50% prior to the start of the painting. As well as I can give you update photo of how the piece is going so its not a surprise at the end.
Price will be determined by size and detail.
Custom reptile hides, basking platforms or climbers are also available, just send me a private message on Facebook with your ideas and the size you are looking for. A 50% down payment will also be required.
Other ideas for products include things like hammocks for small to medium sized lizards.
I would love to hear your feeback in regards to the current store, up in coming products and customized items.
Thanks for all your support!
Robin.
Friday, 19 September 2014
BACKGROUND STORY: PHOENIX
Phoenix's story is very short for me, I have had her just under a year now. I purchased her from her previous owner in Ottawa and had her shipped to me.
When I got her she had a lot of stuck on shed on her tail and spikes. Parts of her tail actually had about 3 layers of shed stuck on. It took me about 2-3 weeks of constant skin attention to get all of the stuck shed off, the spikes were the harder as I didn't want her to loose any of the spikes.

Since I got her almost a year ago I have had to work with her constantly as she has aggressive and territorial behaviours. She doesn't like the be held and she will bite and attack but over time she has gotten a lot better to the point where I can work with her a lot easier and don't have to restrain her as much at the beginning of the training session.
Keep an eye out for updates on her.
Robin.
When I got her she had a lot of stuck on shed on her tail and spikes. Parts of her tail actually had about 3 layers of shed stuck on. It took me about 2-3 weeks of constant skin attention to get all of the stuck shed off, the spikes were the harder as I didn't want her to loose any of the spikes.
Since I got her almost a year ago I have had to work with her constantly as she has aggressive and territorial behaviours. She doesn't like the be held and she will bite and attack but over time she has gotten a lot better to the point where I can work with her a lot easier and don't have to restrain her as much at the beginning of the training session.
Keep an eye out for updates on her.
Robin.
Sunday, 14 September 2014
PROFESSIONAL ENCLOSURES
So this post goes along with my last post about homemade enclosures.
All the ensure can be made at home if you have the skills with the power tools. These enclosure are made from thicker and nicer materials. These enclosures looks a lot better and cleaner however it cost a lot more to make them like this. Here are the enclosures that my boyfriend and I had made for us.
 .
. 


This is what I use for the heat light. The only thing missing from this picture is the metal bracket that is used to mount the fixture to the enclosure. Then all you need to do is drill a hole where the bracket is going for the cord to go out of. The cords that I use are called lamp replacement cords, so they have a on/off switch bout halfway down the cord. For the UV light fixture I just use a normal 18inch light fixture that you can purchase at any home improvement center.
I find these fixtures to look a lot cleaner than the domes and if you have a dome inside an enclosure this will open it up more and allow the light to expand more.
If you have any questions or concerns please contact me on my instagram or Facebook page.
Robin
All the ensure can be made at home if you have the skills with the power tools. These enclosure are made from thicker and nicer materials. These enclosures looks a lot better and cleaner however it cost a lot more to make them like this. Here are the enclosures that my boyfriend and I had made for us.
.
At the time we had these made my boyfriend had a god friend who worked at a cabinet factory. He made these for us for just the cost of the materials and they bought the materials cheaper than what we can get them for. So we got an excellent deal on these. I believe Billy's was $150 and Phoenix's was $100
Billy's enclosure is about 6x3x3 and Phoenix' is 5x4x2
So when you are thinking about building your iguana (or other lizard/snake) an enclosure there are many things to think about, how big it ends to be, how long until my lizard out grows it, what your budget is and if you are making it or have it made for you. Always draw out what you what it to look like prior to making it so you can fully see and visualize if it will fit for your iguana.
Things I would change if I re-di either of them, one would be the doors on Billy' enclosure, I would make them extend all the way to the bottom of the enclosure like Phoenix's, this would allow more light in the bottom and make it easier to clean. Secondly I would make Phoenix's enclosures little bigger but I love the design of he's more than the rest of my enclosures.
You may have noticed I do not have any domes in these enclosures, as I stated in my last blog I am taking all the domes out and replacing them with light fixtures.
This is what I use for the heat light. The only thing missing from this picture is the metal bracket that is used to mount the fixture to the enclosure. Then all you need to do is drill a hole where the bracket is going for the cord to go out of. The cords that I use are called lamp replacement cords, so they have a on/off switch bout halfway down the cord. For the UV light fixture I just use a normal 18inch light fixture that you can purchase at any home improvement center.
I find these fixtures to look a lot cleaner than the domes and if you have a dome inside an enclosure this will open it up more and allow the light to expand more.
If you have any questions or concerns please contact me on my instagram or Facebook page.
Robin
Thursday, 11 September 2014
HOME MADE ENCLOSURES
So I will be posting three different blogs in regards to all my enclosures. This one is on enclosures that I have made myself the second will be on enclosure I had professionally made and the last one will be on Sassy's room and what I have done with that and pans for the room in the future.
So for this post I will start off by discussing some options when it comes to homemade enclosure. There are two types.
1. Made from scratch
2. Transforming furniture
If you are really handy with tools or you need an enclosure so large that you cannot find a suitable cabinet, wardrobe or hutch you may chose option one. This allows you to completely design your enclosure to the exact size and theme that you would like and that would fit your house the best. These enclosure can look amazing and can be very unique but can cost a lot depending on the size and material you choose to use as well as how much detail you put into it..jpg)
.jpg)
The above enclosure is one my boyfriend, my dad and I made a couple years back. It housed our savannah monitor until he outgrew it. This could easily be used for a baby iguana when it's standing up like in the second photo. This enclosure was made with good and thick plywood which can get pricey but it wasn't that big so one sheet would most likely would have done it. We got lucky and had enough laying around we didn't need to buy any more. This is a very basic but good structure for a baby iguana or chameleon etc. If the materials where bought the entire enclosure may have only cost about $60 for everything but in regards to a green iguana, it wouldn't last them that long.


The last one I want to show is my savannah monitor enclosure. This one my boyfriend and I made very fast and could definitely have been made better. It was something we needed to put together quickly for him.

So for this post I will start off by discussing some options when it comes to homemade enclosure. There are two types.
1. Made from scratch
2. Transforming furniture
If you are really handy with tools or you need an enclosure so large that you cannot find a suitable cabinet, wardrobe or hutch you may chose option one. This allows you to completely design your enclosure to the exact size and theme that you would like and that would fit your house the best. These enclosure can look amazing and can be very unique but can cost a lot depending on the size and material you choose to use as well as how much detail you put into it.
The above enclosure is one my boyfriend, my dad and I made a couple years back. It housed our savannah monitor until he outgrew it. This could easily be used for a baby iguana when it's standing up like in the second photo. This enclosure was made with good and thick plywood which can get pricey but it wasn't that big so one sheet would most likely would have done it. We got lucky and had enough laying around we didn't need to buy any more. This is a very basic but good structure for a baby iguana or chameleon etc. If the materials where bought the entire enclosure may have only cost about $60 for everything but in regards to a green iguana, it wouldn't last them that long.
The above enclosure is Pip's my smallest iguana. I only paid $20 for this TV cabinet, its a very heavy and sturdy piece of furniture, the Plexiglas was another $25 and the plywood I used to cover in the back I had laying around. So this enclosure also didn't cost me much either. This enclosure can be made bigger by removing the shelf and extending it all the way to the bottom, I will do this once he gets a bit bigger. TV cabinets can make great enclosures with very little work. I do not have any eight domes in this enclosure but I will explain more about that in my next blog.
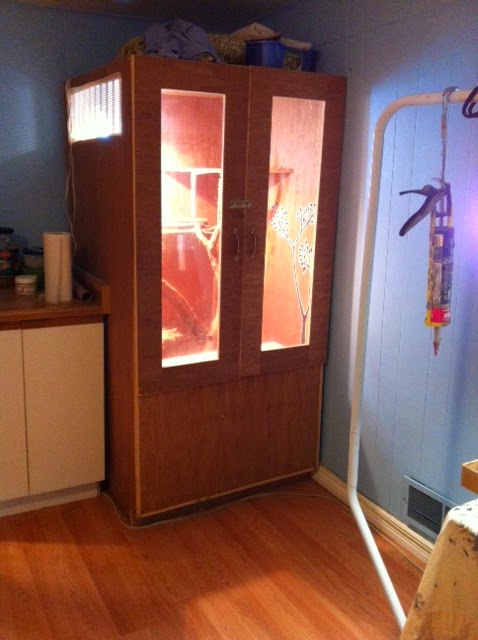
This enclosure used to house both Pip and Molly when I first got them. We actually already had this wardrobe, I believe we only paid $40 for it back before we had Molly or Pip. When we moved to a bigger place we no longer needed it so I transformed it into a enclosure for my axanthics. I took out the middle divider and dressed the inside up to work for them. Shortly after I got them I put the divider back in so that there so that Pip and Molly both had a half. Once they outgrew it I then gave Pip the previous enclosure and took the divider out and Molly got this entire wardrobe. This enclosure has been altered so much that I will not be keeping it. I was planning on upgrading her to a bigger one as she has outgrown this one. However with the recent events of my basement flood and needing renovated it will be a little bit before she gets her new enclosure. The most expensive part for this enclosure was the Plexiglas.
Wardrobe enclosures are one of my favourites as they give you so much room to work with a sturdy frame.
The last one I want to show is my savannah monitor enclosure. This one my boyfriend and I made very fast and could definitely have been made better. It was something we needed to put together quickly for him.
This enclosure is a 6x4x3. The way it is designed is so you can take he top off of the bottom to make it lighter to move and able to fit through a door. As some of you may know my savannah monitor Louie has MBD that has effected his legs. This enclosure does not suit him so he will be getting a new one built that fits him better. This one will then be stood up on its end to be 6ft tall and will be Billy's new enclosure, which means Molly will get Billy's current one as her upgrade. When the time comes that I do that switch I will show that transformation on the enclosure. This enclosure in total didn't cost more than $100 and is a very simply design that can work for many different species. (I took this photo today, so that's why the flooring is being torn up because of the flood we had.)
So those are all the enclosure I have that we built ourselves. These are cheap and easy to build with basic power too skills.
Lastly you may have noticed that in Pip's enclosure has no domes in it. When ever I upgrade an enclosure I take the domes out and replace them with an actual light fixture. I will discuss this more with details of how to install them with my next blog post about the professionally made enclosures.
If you would like help designing or creating an enclosure you are free to contact me via Facebook or instagram for ideas and support.
Robin.
Ontario Iguanas
Saturday, 6 September 2014
MY REPTILE ROOM
So if anyone lives in South-western Ontario, Canada and was awake during that massive storm we got the late couple of days. You may be able to relate to my story.
We had a massive amount of rain and we found out that we now have a crack in the foundation of the house. This caused water to come into my reptile room. The water got under the flooring and destroyed the whole thing., from one side of the room to the exact opposite.
My boyfriend and I have been wanting to renovate the basement for awhile but we knew it wouldn't be for a couple of years most likely. However that seems to have changed. Since the flooring is now so damaged in that room we will be renovating the basement very soon.
This will be a great upgrade. The basement currently has a very uneven floor, cheap flooring and just wooden panels on the walls with little to no insulation in the wall.
So we will be able to level the floor, put nicer flooring down and insulate the walls and cover with drywall and a nice coat of paint
I am unsure at how fast this will happen but it now needs to be done. So we will be holding off making Molly's new enclosure until the new floor is done.
So keep an eye out for updates.
Robin
We had a massive amount of rain and we found out that we now have a crack in the foundation of the house. This caused water to come into my reptile room. The water got under the flooring and destroyed the whole thing., from one side of the room to the exact opposite.
My boyfriend and I have been wanting to renovate the basement for awhile but we knew it wouldn't be for a couple of years most likely. However that seems to have changed. Since the flooring is now so damaged in that room we will be renovating the basement very soon.
This will be a great upgrade. The basement currently has a very uneven floor, cheap flooring and just wooden panels on the walls with little to no insulation in the wall.
So we will be able to level the floor, put nicer flooring down and insulate the walls and cover with drywall and a nice coat of paint
I am unsure at how fast this will happen but it now needs to be done. So we will be holding off making Molly's new enclosure until the new floor is done.
So keep an eye out for updates.
Robin
Wednesday, 3 September 2014
TANKS VS HOME MADE ENCLOSURES.
I apologize if I am repeating myself a bit here however I feel it is important to talk about the pros and cons when it comes to different styles of enclosures and the health effects it can have on your lizard.
The following photo is not mine...I copied it off Google image for an example as I have never housed any of my its in a glass tank.
Now there are many problems with this set up, most obvious is the lack of space for an iguana that size.
Pros of having a tank, very easy to clean, can be a great first home for a hatchling ig but they will out grow it fast.
Cons. Tanks only last a short period of time, they outgrow them fast, if bough new they can be very expensive. Not enough vertical climbing space for any age of iguana.
In regards to the following photo...Tanks do not often come more vertical than they are horizontal. This means you can get a massive tank, say a 90 or 120 gallon tank but it still isn't fit for an iguana older than a hatchling. Iguanas are arboreal which means they spend a majority of the time in trees and climbing. This is what their muscles are meant for and they need to be able to get the proper climbing exercise while in their enclosure to have god healthy muscle mass and you cannot get the proper climbing environment with any size tank (unless custom built, but that cost so much you might as well make a much larger wooden one for the same price).
I only recommend tanks as a last resort and only for hatchling iguanas. Iguanas are just not built to be able to live to their full potential in a glass tank.

 So this is what Sassy's enclosure looked like when I was finished with it, for the most part she didn't have a door on it and when the door was on it was often left open for her. I really loved this enclosure but Sassy did outgrow it. This cage was about 6x4x4 I believe. This is a very simple design, and with basic skills with power tools very easy to build. In total I don't believe this cost me over 150$.
This size enclosure would be great for any age iguana from about a year up until they are full grown, then they would need a little bit bigger in my opinion.
So a custom built enclosure can be a lot nicer, more unique and over all a better fit for your iguana at any age vs a glass tank. There are many different designs of enclosure and each of my iguana enclosure are so different which you will see in the up incoming blog post.
Get the best enclosure for your iguana and your money by simply building one yourself or with some help.
If you would like help drawing up and enclosure and helping turning pieces of furniture like wardrobes or hutches into enclosures simply send me a photo of what you have or the size you would like and the budget you have. I can help you draw something up for your iggy that will be stimulating for your ig and look beautiful in your home.
Contact me on my integral page or Facebook page in regards to enclosure ideas :) and keep an eye out for my up incoming enclosure blog post for more ideas for beautiful and inexpensive enclosures.
Robin.
The following photo is not mine...I copied it off Google image for an example as I have never housed any of my its in a glass tank.
Now there are many problems with this set up, most obvious is the lack of space for an iguana that size.
Pros of having a tank, very easy to clean, can be a great first home for a hatchling ig but they will out grow it fast.
Cons. Tanks only last a short period of time, they outgrow them fast, if bough new they can be very expensive. Not enough vertical climbing space for any age of iguana.
In regards to the following photo...Tanks do not often come more vertical than they are horizontal. This means you can get a massive tank, say a 90 or 120 gallon tank but it still isn't fit for an iguana older than a hatchling. Iguanas are arboreal which means they spend a majority of the time in trees and climbing. This is what their muscles are meant for and they need to be able to get the proper climbing exercise while in their enclosure to have god healthy muscle mass and you cannot get the proper climbing environment with any size tank (unless custom built, but that cost so much you might as well make a much larger wooden one for the same price).
I only recommend tanks as a last resort and only for hatchling iguanas. Iguanas are just not built to be able to live to their full potential in a glass tank.
I will be doing another blog post about all of my enclosures that I have for my iguana (one enclosure per blog post for full details)
However I no longer have the enclosure that is in the flowing pictures, this was Sassy enclosure that I made back in 2010 and she kept for about a year to a year and half before being free roam in my apartment to having her own bedroom in my house now.
This size enclosure would be great for any age iguana from about a year up until they are full grown, then they would need a little bit bigger in my opinion.
So a custom built enclosure can be a lot nicer, more unique and over all a better fit for your iguana at any age vs a glass tank. There are many different designs of enclosure and each of my iguana enclosure are so different which you will see in the up incoming blog post.
Get the best enclosure for your iguana and your money by simply building one yourself or with some help.
If you would like help drawing up and enclosure and helping turning pieces of furniture like wardrobes or hutches into enclosures simply send me a photo of what you have or the size you would like and the budget you have. I can help you draw something up for your iggy that will be stimulating for your ig and look beautiful in your home.
Contact me on my integral page or Facebook page in regards to enclosure ideas :) and keep an eye out for my up incoming enclosure blog post for more ideas for beautiful and inexpensive enclosures.
Robin.
Subscribe to:
Posts (Atom)